Animating in MMD
A Short Guide
to Get Started
So, MMD. It stands for MikuMikuDance, a Japanese 3D animating program originally used for vocaloids (essentially characters that have voice boxes and people use those voices to make songs). I started dabbling in MMD roughly 4 years ago, but vocaloids (and by that extent MMD) were something I had loved for a veeeery long time.
I had found someone who made pretty good animations (and videos) in MMD, so I reached out to them for some direction of where to get the program. LearnMMD is what they showed me and I continue to navigate to this site when I need guidance about anything with the program.
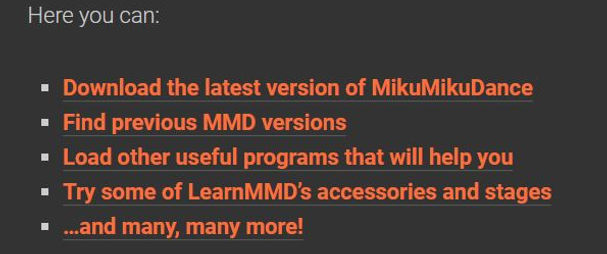
LearnMMD has plenty of different tutorials to teach you and direct you!
Now, you can either make your own animation in the program OR you can download motions (animations) that other people have put online. Personally, I end up downloading these motions and editing them to fit the models I use or to "meet" my standards (so, if an animation looks a bit wonky, I try to fix it). You can easily find motions through Youtube (typing in "MMD" plus a popular song and then motion). I'd also recommend setting up a NicoNico (a Japanese website, kind of like Youtube) account eventually, as some users upload their motions there.

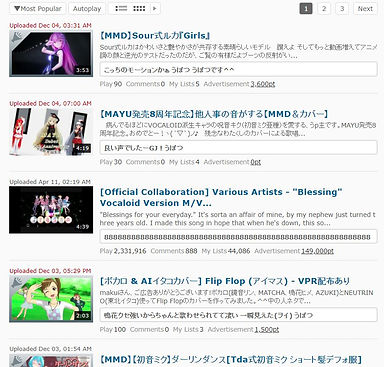
Youtube (left) and NicoNico (right) both have lots of videos that offer motion downloads for various songs.
If you want to try your hand at animating the models yourself, though, it's simple enough. Well, to a degree. Moving the models is easy, but the timing of the frames is where it gets tricky. That's something that will get easier as time goes on, but there are tutorials out there to guide you through animating.
When you open up the program you'll be greeted by this:

You can resize the window to whatever size you want. The buttons will conform to the window size.
On the left is the frames. There, you'll see your motions data points for the model or camera (and co.), depending on which mode you're in (the button to switch modes is the "To model/To Camera" button to the bottom right of the frame panel). Along the bottom will be the 'controls' for either the camera or the model. Here is where you'll register your data (so if you move the model's arm, you can save that position). At the top is options and settings, along with where you'll save or load motions. And at the top right there, where it says "MMEffect", that's where you can click through any effects you download. However, you need to install MMEffect separately (as in, it doesn't come with MMD).
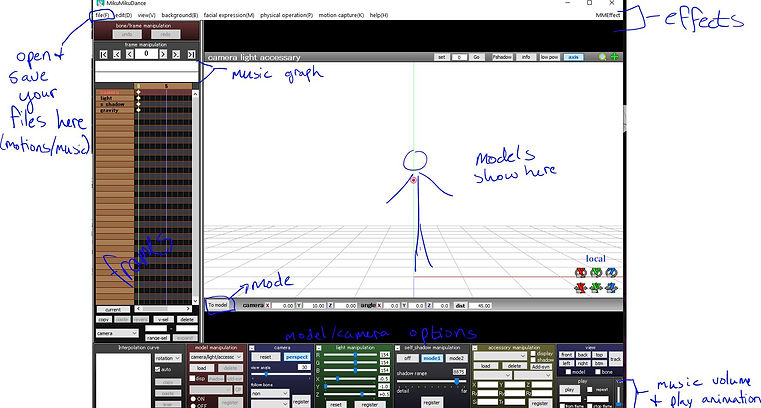
Some labels if you don't quite understand what I mean.
Before you can animate, of course, you need a model! Now, the program should come with models, but if you want to go searching for some then go ahead and do that. I usually search either Google or DeviantART for models. Simply type in "MMD models dl" or a specific character's name (with "MMD model dl") to find a model.
I'll be using my own models of my characters to demonstrate for today.
To load in your model, click the "To model" button labelled as 'mode' in the above screenshot.
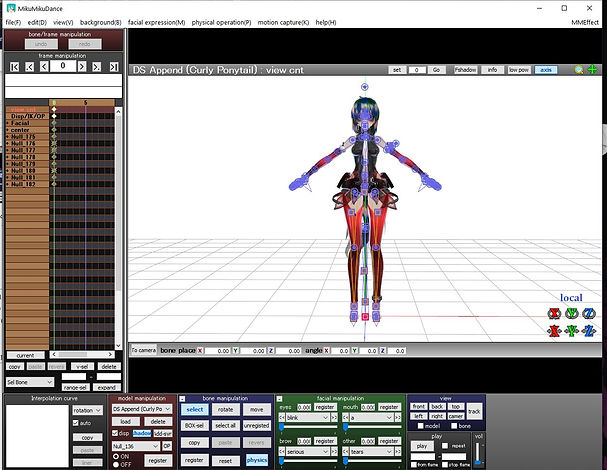
I'll be using Darkstar for this. Your model should appear in the same spot as her, with the same T-pose. If you don't see the blue dots, either click the mode button (it must say "to camera" for it to be in model mode) or click the select button under the bone manipulation panel.
Now most people use MMD to animate characters dancing to music, but you're free to animate anything you want. To keep it simple, we'll animate the character waving. Add whatever extra details you want to your animation, especially if you want to get across a certain personality.
First, let's get our base pose down. The blue dots and squares each control a bone on the model. Circles mean you can only rotate the bone, squares mean you can rotate and move the bone.
Find your model's 'center' and move them slightly if you want. I'm going to have Darkstar standing with her weight on one leg, so she needs to be standing to the side a little bit.

Your model might have excess buttons as well or the bones might not be named. To test if it's the right bone, go ahead and click and move the square around. If the model doesn't move with your movements, then it's the wrong button.
This center button should make the model bend their knees when you drag down.

After you've moved it to a position you like, then hit the register button. Make sure you're on frame 0 so the model's pose you set for it is the beginning of the animation.

If you don't see a data
point show up,
don't worry too much.
It should still be registered,
however you won't be able
to delete the point
unless you hit undo.
Continue to do this for the rest of the bones. You'll want to move the legs, arms, neck, head, etc. You'll find the bones here for all of those:

The fingers are all independent, like the rest of the model's body. It's tedious, but it makes for more freedom in posing.
Please remember each time you move a bone to
REGISTER it,
otherwise you'll have to do it again!
Once you have a pose you like, you can start using the frames to animate. If you'd like, click select all on the bone manipulation box and register for frame 0.
Waving is a simple enough animation. If you want it to be more lively, then go ahead and move other bones too, but if not then you only have to worry about one arm.
When you animate, keep in mind how it looks in real life. You want to mimic that movement. If you need to, look up the movement or do it yourself. For waving, at the very least you have one entire arm moving. The shoulder lifts up, the elbow bends, and depending on the style of waving, either just the wrist and fingers will move or the forearm and the hand.
Darkstar's not that animated, though, so I'm going to keep her wave as un-energetic as possible.
Frame timing is a bit tricky. You don't want to put too many frames between the last pose and the new one, otherwise it'll take forever for the model to move. But too few will look unnaturally fast. Test out the animation with the play button to find what fits your animation. I'm keeping at least 5 frames between the original pose and the new one.
You also don't usually want to keep doing "select all and register". There may be bones you need to move slower or faster than others, so stick to individual registers.
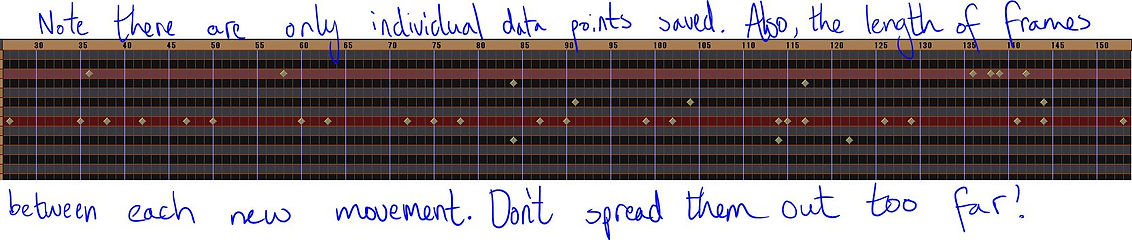
Remember to utilize that "play" button to test the animation. It'll help a lot to give you a sense of the timing/speed and whether data points needs to be more spread out or closer.
It's tedious work, especially when you start moving more and more bones, but the end results are always fun! I'd recommend for beginners to go ahead and mess around with animating on their own, but also to download other motions and see how they utilize frames. Practice moving the model with an already set motion to add your own touch to the pre-existing motion.
Also be sure to mess with the camera! You can do a lot of twists and turns with it (really any camera angle you can think of), and there's also the color/lighting options to mess with. You can make some really cool animations using these tools. Even something as simple as a wave can be a bit dramatic with the right angle and lighting.
This is a bit over-dramatic, but you get the point.
Keep in mind if you do use other people's motions or models (or effects), and you want to upload it to someplace like YouTube, you should ALWAYS credit the person who made the motions and whatnot. After all, it is their work!
Some final things to also keep an eye out for or do when animating in MMD.
One, ground shadows and model outlines are things you can usually turn off for your animation.
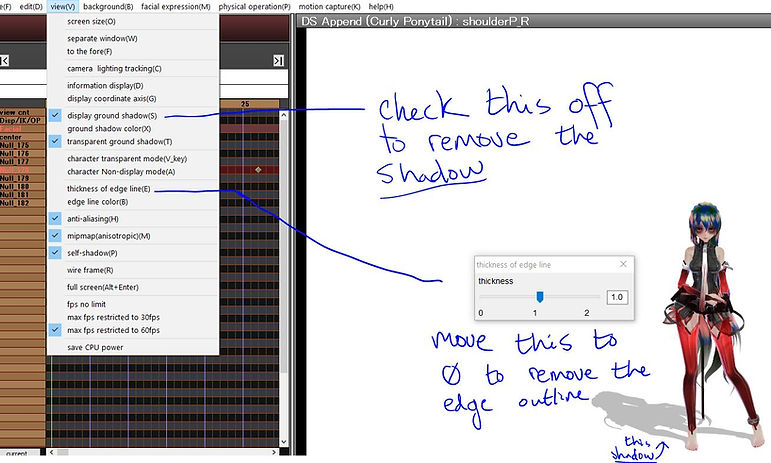
You don't have to remove these, by the way. With some effects, however, you might want to otherwise it'll stand out and not look good.
Also, to change the outline thickness, you MUST be in model mode!
If you want a black background instead of white, you can change that here:

Videos require a few extra steps to work in the background.
Turn on/off physics and change the gravity settings here:
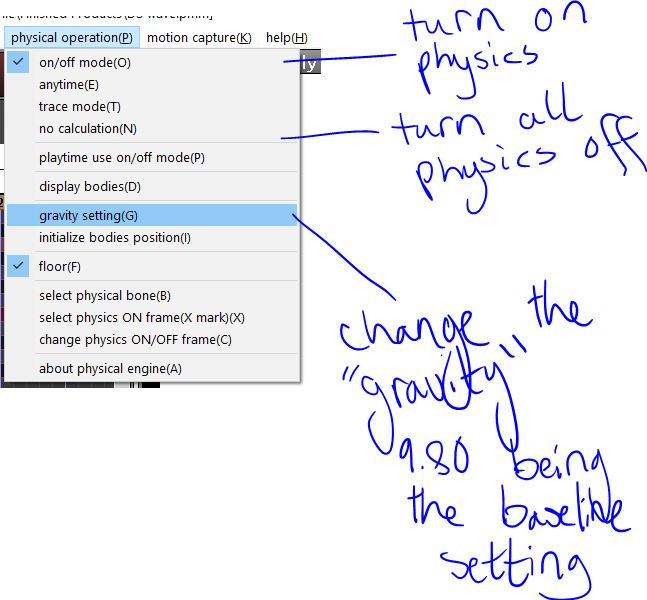
Yes, you can make it zero gravity if you so choose.
Turn the axis plane on or off here:

The final recording of the animation usually shouldn't have an axis plane in it.
To record your video, you have a few options. First, be sure that you're in camera mode and that you have everything to where you want it (watch it before recording!) Once you're happy with it, go to file and SAVE. Really, you should be saving frequently so you don't lose any progress should the program or your computer crash.

Take it from me! You don't want to lose all your progress, so save OFTEN! I cannot repeat this enough.
Then go back to file and click "render to AVI file". You'll get some options here for what the video will output. Personally, I just stick to raw AVI files, but these files are chunky, so if you have limited space, I'd try a different one. There's other tutorials and such out there on these codecs, so if you're uncertain about one or don't want to test it out on your own, simply look up "MMD codecs".
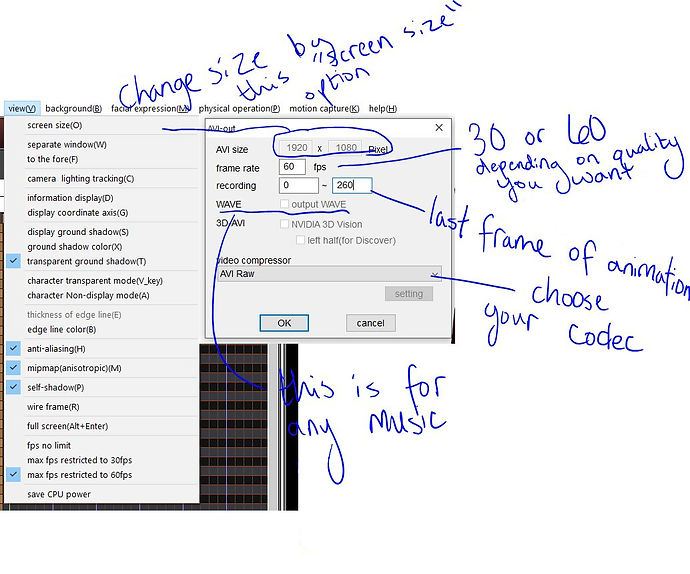
You can check the "output wave" to record the music too, but the sound quality might be choppy or messed up if you do.
Also, be sure that you record from frame 0 to a little bit past the last frame of animation. In this case, about 10 frames after the last data point was frame 260.
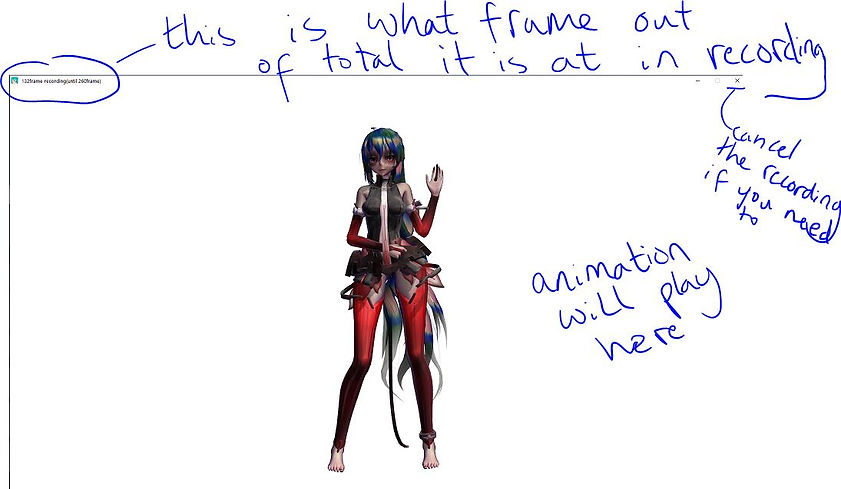
When it starts rendering, it'll "minimize" the program and open up a new window to record the animation without the interface. You can press alt and enter in the program to enter full-screen mode before recording to see how it will look as well.
Just a reminder that on a slower computer, this process is going to be taxing. On my old computer, I'd leave it to animate overnight with only MMD open.
And with that, you're animation will be done! Look into some video-editing programs if you'd like to add on to your animation, change the file extension or compress the file size. For this project I used VSDC video editor, which is free to use and has a lot of tools for editing. However, if you're looking for a simpler interface or otherwise, there are plenty of other options out there.
The final animation is complete now!
If you're interested in seeing some of my own MMD videos, you can find them on my YouTube page here!
Be sure to explore the rest of my page as well. I've got another blog on designing characters, so if you ever get into the model-making scene for MMD, you can check that blog out to make your own characters for MMD!
Thanks for checking in.